|
<< Click to Display Table of Contents >> Top Opening Designer |
  
|
|
<< Click to Display Table of Contents >> Top Opening Designer |
|
The Top Opening Designer makes it possible to manually rotate or offset the top openings of reducing parts in the structure. Additionally, it provides the ability to customize the positions of included steps on a part-by-part basis.
![]() The Stack button opens the Manhole Stack screen and activates the stacking process. A structure must be stacked before the Top Opening Designer can be activated.
The Stack button opens the Manhole Stack screen and activates the stacking process. A structure must be stacked before the Top Opening Designer can be activated.
Top Opening Position
For new structures, the top openings are positioned automatically according to Part Style. The top openings for eccentric reducing parts are positioned adjacent to the wall, and openings in concentric reducing parts are positioned in the center of the part.
|
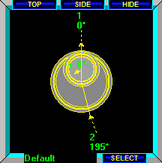
To override automatic top opening positioning, double-click on the Top View panel on either the Stack or View screen to open the Top Opening Designer.
|
![]()
Click the Enable button to make the Top Opening Designer grid appear.
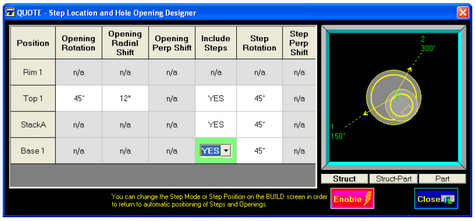
For each reducing part in the structure, there are 3 different ways to customize the top opening position:
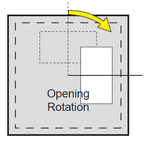
1. Opening Rotation Opening Rotation is the degree location around the part to which the opening will be pointed. Top openings in rectangular parts can only be rotated in increments of 90 degrees. It is important to note that the Opening Rotation is in addition to any rotation that has been applied to the part from lower opening rotations.
For example, if a reducing part has it’s opening rotated by 45 degrees, the structure above the reducing part will be rotated by 45 degrees. Then if a top part above the reducing part has it’s opening rotated by 45 degrees, the overall effect will be that the top opening is rotated a total of 90 degrees.
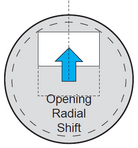
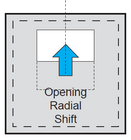
2. Opening Radial Shift Opening Radial Shift moves the opening along a radial line from the center to the edge of the structure. The value entered is the amount the opening will be shifted from the center in the direction of the Opening Rotation.
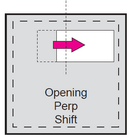
3. Opening Perp Shift Opening Perp Shift (or Perpendicular Shift) moves the opening left or right from the radial line.
The value entered is the amount the opening will be shifted perpendicular to the radial line indicated by the Opening Rotation.
Perp Shift is only applicable to rectangular parts.
To rotate or shift the position of a top opening, click on the cell that matches the assembly position and data column that you would like to change, and type the desired value into the box that appears.
If the radial or perp shift specified is larger than the physical limit of the part, it will be reduced to fit the edge of the part.
The resulting dimension for locating the opening can be included on printouts. For more information refer to page 139 - “To configure a layout”. |
|
|
|
|
|
|
|
Step Position
For assemblies that have Steps as an available option, there are three additional columns for controlling the step position:
1. Include Steps turns on or off the inclusion of steps for each assembly position.
2. Step Rotation controls the angle from the center of the part that will be used for positioning the steps along the outside wall. It is important to note that Step Rotations are in addition to any Opening Angles specified in assembly positions beneath the currently selected one.
3. Step Perp Shift is only available for rectangular parts, and allows for shifting the steps along the wall, starting from the position set in Step Rotation.
The Top View Display has three display modes; 1) the entire structure, 2) the current assembly position in relation to the structure, and 3) the current assembly position in relation to itself.
Click the buttons beneath the display panel to select the desired Display Mode.
![]()
The Struct button makes the Top View display the entire structure all at once.
![]() The Struct-Part button makes the Top View display the currently selected assembly position in relation to where it would be if the rest of the structure was also drawn.
The Struct-Part button makes the Top View display the currently selected assembly position in relation to where it would be if the rest of the structure was also drawn.
![]()
The Part button draws the currently selected assembly position in relation to only itself, no rotations from other (lower) parts applied.
![]() When you are finished customizing the Top Opening positions, click the Close button.
When you are finished customizing the Top Opening positions, click the Close button.
Once manual Top Opening control has been enabled, STACK-IT will suspend automatic positioning of steps and top openings for this structure.
To re-activate automatic positioning, return to the Quote Build screen and change the Position Mode away from “Designer”. STACK-IT will then remove any manual opening position changes that have been made in the currently selected structure.
![]()
Top Opening Location Dimensions
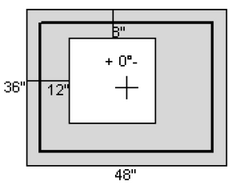
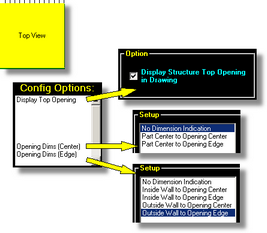
Top opening dimensions can only be included in Top View drawings on part-based layouts (shop drawings).
Configured via the Report Layout Configuration screen, this feature allows part-based Top Views to draw dimension lines and labels that show the distance from the center or walls of a part to the center or edge of the part’s top opening.
To display the location dimensions, in the Report Layout Configuration screen, select a layout with a Top View page object and click the Edit button. Click to activate the Top View page object and select the desired options.
Zero Degree Face
The Zero Degree Face factory option determines which side of a rectangular part will be oriented to face 0 degrees.
For example: on a 24” x 36” part, the default orientation is for the 36” side to face 0 degrees. This option allows the zero degree face to be switched to the 24” side.
|
More information |