|
<< Click to Display Table of Contents >> RelatePosition Components |
  
|
|
<< Click to Display Table of Contents >> RelatePosition Components |
|
![]() The Position Components panel is used to specify the active positions and the parts for each position in the assembly.
The Position Components panel is used to specify the active positions and the parts for each position in the assembly.
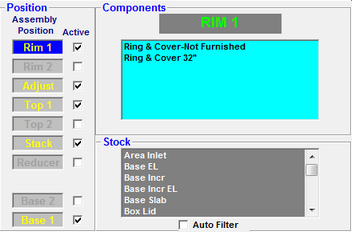
Assembly Position

The items under the heading "Assembly Position" show the elements of a manhole structure and their relative position in the stack.
All Assemblies require at least one component to be specified in any of the Top1, Stack, or Base1 positions.
Typically only one Rim, Top, and Base position will be used, but two positions can be used for each when a particular section of the stack needs a second part. For example, some bases may be made using a riser seated on a slab. In such a case, the slab would be identified in the Base1 position, and the riser in the Base2 position.
Several Stack and Adjust assembly parts may be used to complete the stack.
Parts used in the stack and adjustment positions must have a non-zero height (set on the Stock screen).
Assemblies often have several other positions specified in addition to the basic three.
To select an Assembly Position, click the assembly position label. When a position is selected, the background of the label will be highlighted in blue.
When an Assembly Position is selected, the Components list will show all of the parts that may be used in that assembly position.
Active
![]() To the right of the Position list is a column of check boxes under the heading "Active."
To the right of the Position list is a column of check boxes under the heading "Active."
When these boxes are turned on with a click, the corresponding Position is active for the currently selected relationship.
For an Assembly Position to be used in the relationship, the Active check box must be checked.
Positions with no check in the active box are ignored, and considered inactive.
The position can be made inactive by clicking a box that is checked.
If the Reducer is inactive, the Stack position below the Reducer is automatically inactive as well.
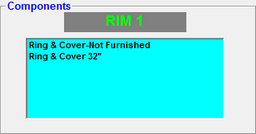
Components
|
The Component field lists the preferred and all optional components assigned to the selected assembly position.
The label above the list identifies the currently selected Position.
Each Assembly Position will have its own component selections. The component shown at the top of the list is the preferred part. The remaining components on the list are optional components.
To change the order of the components in the list, put the mouse pointer over the component to be moved, hold down the left mouse button and drag the component up or down to the desired location. To remove a component from the list, double click the component to be removed. |
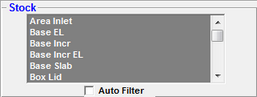
Stock
|
The stock list shows the components from the Stock screen that may be assigned to the assembly.
To add an item to the Components list double click the desired component in the Stock list. The selected component will be added to the bottom of the Components list. |
Auto-Filter
![]()
The Relate screen features an "Auto Filter" check-box located below the Stock Components list. When this box is checked, several functions are performed.
First, the Stock Component list will display only those parts that are the correct size for use in the currently selected assembly position.
Second, the assembly is "Automatically Validated" each time a position is selected. This validation starts at the Base1 position and works up to the currently selected assembly position. If a position cannot be validated, a message will be displayed to identify the problem.