|
<< Click to Display Table of Contents >> Stencils |
  
|
|
<< Click to Display Table of Contents >> Stencils |
|
STACK-IT has the ability to print job, structure, and part information directly to stencil-cutting machines. This capability allows you to create stencils accurately and automatically, with a variety of options for customizing.
The Stencil button will be visible on the Quote Print screen only if it has been turned on by request.
![]() Clicking on the Stencil button from the Quote Print screen will activate this feature.
Clicking on the Stencil button from the Quote Print screen will activate this feature.
For optimal usage, the printer page width should be set less than the actual page width. For example: if the paper is 15” wide, the printer page width should be set to 13” in order to keep data from running into the edge. This can be set by clicking on the Start Menu > Settings > Printers. In the list of printers, right-click on the stencil printer and choose ‘Properties.’ Find the setting that specifies the ‘Work Area’ of the page, and set the width to be two inches less than the actual width of the paper.
The Stencil Screen has a variety of options that can be used to configure the way in which your stencils are created.
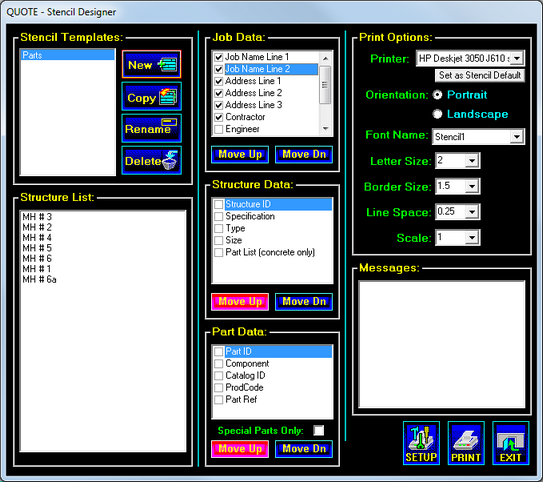
There are three types of stencils that can be created:
1. Job Stencils – Only one of these stencils is printed each time, regardless of how many structures are selected. It contains information that is specified on the Quote Name screen, such as: Job Name, Job Location, Contractor, and Delivery Date.
2. Structure Stencils – One of these stencils will be printed for each structure that is selected. These contain more detailed information about the structures within a job, such as the Structure ID, Specification, or a list of the concrete parts.
3. Part Stencils – One stencil is created for each concrete part in each structure that is selected. A part-based stencil provides detailed information about each concrete part, such as Part ID, Product Code, and Part Reference Number.
Checking the “Special Parts Only” check box will print stencils for only parts that have invert penetrations. Leaving it unchecked will print part information for all parts specified by the stencil factory options.
![]()
Objects in each section will be printed in the order that they appear in the list. Use the ‘Move Up’ and ‘Move Dn’ buttons to change the order of the items.
![]()
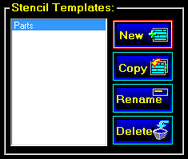
Settings can be saved into Stencil Templates, where they can be stored for future use.
|
To create a Stencil Template, click the New button and provide a name to assign to the template.
Click the OK button and the program will create and open the new template.
Any changes you make to stencil settings will be saved in the selected template. |
![]() On Windows NT, 2000, and XP, the Stencil screen will have a Print Setup button at the bottom near the Print button. This allows you to manually make changes to the page size or orientation.
On Windows NT, 2000, and XP, the Stencil screen will have a Print Setup button at the bottom near the Print button. This allows you to manually make changes to the page size or orientation.
The Print Setup screen will also be triggered occasionally when the page size needs to be increased to fit the current stencil, or in order to save paper during smaller stencils. During these times, STACK-IT will prompt you with the settings that need to be made on the Print Setup screen. When this happens, it might be a good idea to write them down before continuing.
Upon entering the Print Setup screen, you should right-click on the stencil cutting machine, and select ‘Printing Preferences.’ This will bring up the appropriate screen on which to make page size changes.
Click OK when the changes have been made, and then click OK again to close the Print Setup screen. Stencil printing should promptly begin.
On Windows 98 and ME, STACK-IT is able to make the page size changes automatically, so the Print Setup screen will not need to appear, nor will the Print Setup button be displayed.
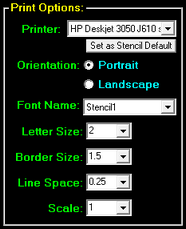
The Print Options panel contains settings that determine how the selected data will be printed.
In the Printer list, choose the name of the stencil-cutting machine that you wish to use.
You can click the Set as Stencil Default button if this is the only device that you plan to use for stencils.
STACK-IT will select the Stencil Default printer each time the screen is opened.
Page Orientation specifies which perspective should be used in printing the data. This is particularly useful if you plan to print a wide (landscape) or
tall (portrait) stencil.
|
The Font Name and Letter Size control what type and size of letters will be used to print the data.
The Border Size controls how much space will be left around each stencil being printed.
The Line Space adjusts how much space is between each line of text in a multi-line stencil.
The Scale controls cutting resolution, which may need to be adjusted based upon your specific stencil machine. As of the printing of this manual, the optimal setting for most current machines was 5.
The scale can be calibrated by setting (letter size = 1) and (scale = 5), cut a stencil and measure the size of letter actually produced by the stencil machine. If the actual letter is too small, then the scale factor needs to be increased.
|
|
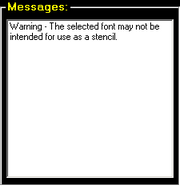
If the font that is selected is not known to be appropriate for cutting stencils, the Messages panel will display a warning.
The Messages panel will display status information about the stencil cutting process. |